Creating Cinematic Looks in Your Photos
There's something about movie stills that feels different from regular photos. That cinematic quality isn't just about expensive cameras it's a combination of aspect ratio, color, lighting, and composition that you can apply to your own work.
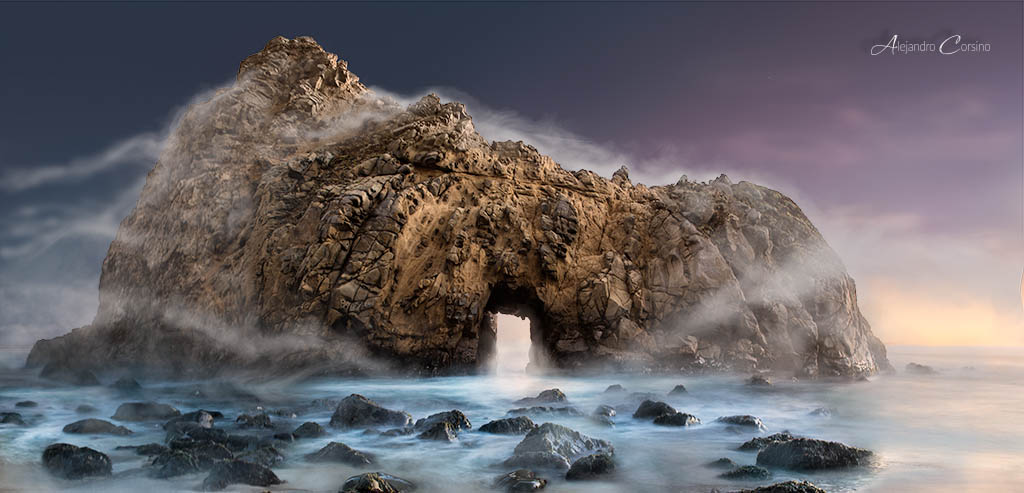
This shot of Pfeiffer Beach demonstrates how natural light can create cinematic mood.
The Cinematic Aspect Ratio
Movies use wider aspect ratios than standard photos:
- 2.39:1 (CinemaScope) The ultra-wide Hollywood look
- 2.35:1 (Panavision) Similar, used interchangeably
- 1.85:1 Standard widescreen, less extreme
Adding letterbox bars immediately signals "cinema" to viewers' brains.
How to Apply in Photoshop
- Open your image
- Use the Crop tool
- Set the ratio to 2.35:1 or 2.39:1
- Compose your crop carefully
Or add black bars:
- Increase canvas size vertically (
Image > Canvas Size) - Fill the new space with black
- This preserves the original image while adding the bars
Color Grading for Cinema
The Teal and Orange Standard
This combination dominates modern cinema for good reason: skin tones are warm, and teal provides complementary contrast. But don't overdo it subtlety is key.
- Color Balance: Cool the shadows, warm the highlights
- Selective Color: Push cyans and blues toward teal
- Curves: Separate adjustments in the blue channel
Desaturation
Movies often use less saturation than we expect:
- Reduce overall saturation by 15-25%
- Keep skin tones relatively preserved
- Let colors be muted but not gray
Lifted Blacks
Film rarely has true black. The darkest shadows are actually dark gray:
- Curves adjustment layer
- Lift the bottom-left point
- This creates that "faded" film look
Color Contamination
Real film stocks have color crossover. Blues affect the shadows, warm tones affect highlights:
- Add a solid color layer (deep blue)
- Set blend mode to Exclusion or Soft Light
- Reduce opacity significantly (5-15%)
This adds subtle color complexity.
Lighting Considerations
Cinematic lighting tends to be:
- Directional Light coming from one side
- Motivated Looking like it comes from a source (window, lamp)
- Contrast-heavy Strong difference between light and shadow
Adding Light in Post
- Create a new layer
- Use a large, soft brush
- Paint white where light would fall
- Set blend mode to Soft Light or Overlay
- Reduce opacity until it looks natural
Adding Atmosphere
Haze and atmosphere separate foreground from background:
- Create a new layer
- Fill with a gradient (white to transparent)
- Set blend mode to Screen
- Reduce opacity
- This simulates atmospheric haze
Depth and Focus
Cinema uses shallow depth of field intentionally. If your photo has too much in focus:
- Select the subject carefully
- Invert selection
- Apply subtle Gaussian blur to background
- Or use Field Blur for more realistic fall-off
Don't overdo it the blur should feel natural, not Photoshopped.
Film Grain
Clean digital images lack the texture of film:
- New layer, fill with 50% gray
Filter > Noise > Add Noise(2-4%, Gaussian, Monochromatic)- Set blend mode to Overlay
- Adjust opacity
For color grain, skip the monochromatic option, but use it sparingly.
Vignetting
Draw attention to the center by darkening edges:
- Create a Curves adjustment layer
- Darken the curve
- Apply a radial gradient to the mask (white center, black edges)
- Feather significantly
Natural vignettes are subtle. If it's obvious, it's too much.
Composition Principles
Cinema borrows heavily from painting:
Rule of Thirds
Place key elements on the intersections. Leave space in the direction subjects are looking or moving.
Leading Lines
Use environmental lines to guide the viewer's eye to the subject.
Framing
Use doorways, windows, and architectural elements to frame subjects.
Negative Space
Empty space creates mood and gives subjects room to breathe.
Practical Exercise
Take one of your photos through the full process:
- Crop to 2.35:1
- Apply the teal/orange grade subtly
- Desaturate slightly
- Lift the blacks
- Add subtle atmospheric haze
- Apply light grain
- Add a gentle vignette
Compare before and after. The transformation should be noticeable but not garish.
Reference Material
Study films known for their cinematography:
- Blade Runner 2049 Extreme color commitment
- No Country for Old Men Natural, desaturated beauty
- Amelie Warm, stylized color
- The Revenant Natural light mastery
- Her Soft, romantic tones
Watch with an editor's eye. Pause on frames. Analyze what makes them work.
The Goal
Cinematic editing isn't about applying presets. It's about understanding how color, light, and composition create emotional responses, then applying those principles deliberately.
The best cinematic edits feel inevitable, like the image couldn't look any other way.